DEFINITION : In A Situation When You Only Want To Print A Specific Selection Data Range From Entire Worksheet, You Can Use A Print Area To Set Or Print The Selection Data Range Only, You Can Select Single Or Multiple Data Range Using The Print Area. You Can Set Multiple Print Areas In A Worksheet. Each Print Area Field Will Be Print On A Separate Page.
When You Print A Worksheet By Applying The Selection Print Area Then Only The Print Area Will Get Printed And Rest Of The Page Will Remain Blank. You Can Add More Cells Or Range To Expand The Print Area Selection As Needed, You Can Also Clear The Print Area To Print The Entire Worksheet.
SET PRINT AREA:
STEPS:
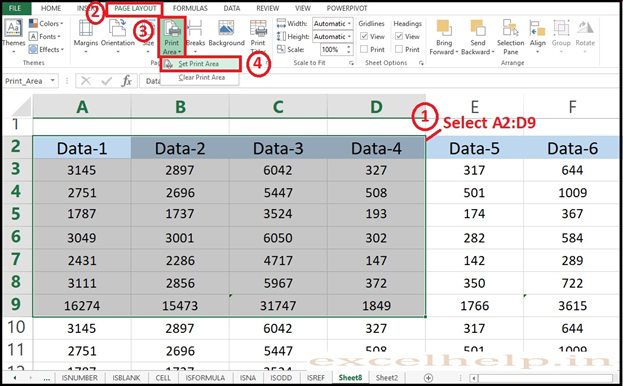
- Select The Worksheet From Which You Want To Print.
- Select The Range Of Data That You Want To Print
- Then Go To Page Layout Tab And Look For Print Area.
- Click On The Print Area.
- You Can Then Check By Clicking Ctrl + P To View The Output On Print Page.
- Once The Area Is Set And The Worksheet Is Saved, When You Return Next Time The Same Setting Will Remain Continue. You Can Clear The Print Setting At Any Time Before Printing.
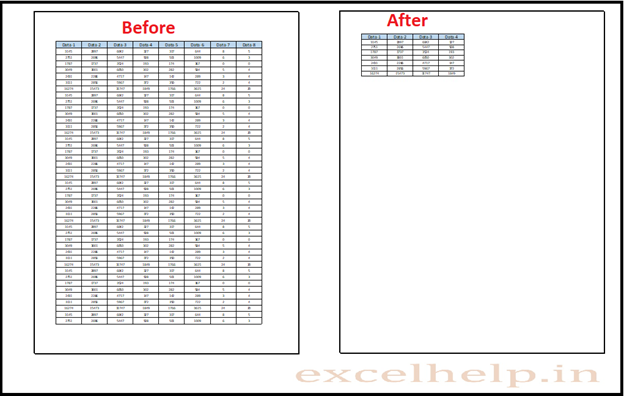
- For Example We Have Data In A Sheet That Having 6 Columns And 20 Rows, And From Which We Only Need To Print A Specific Range A2:D9 Of Data We Can Use Set Print Area.
- You Can Have Different Range As A Print Area on Same Worksheet. All Different Print Area Will Print On Different Pages.
- Please Check The Images Below.
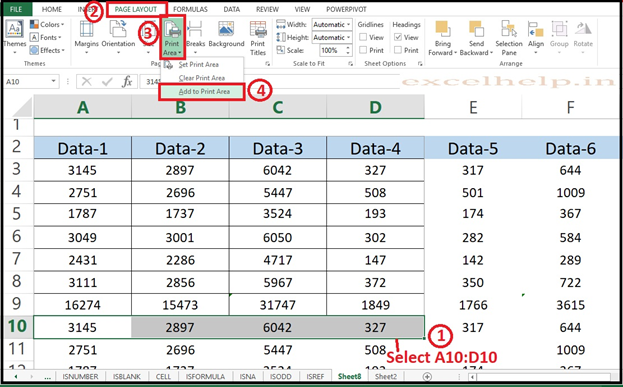
Increase Range Selection To An Existing Print Area Selection :
IMPLEMENT: Suppose You Have A An Existing Print Area Of Range A2:D9 And You Add One More Row A10:D10 It Will Take As Continue Range In A Same Page Print Area. But If You Skip One Row And The You Add A New Range To An Existing Print Area Range Then It Will Set To A New Page And Print All On A Separate Page. Please Look At The Image Below:
NOTE: If The Range That You Are Trying To Add Are Not Adjacent To An Existing Print Area Selection, Excel Will Automatically Create A New Print Area For Those Range And Print All On A Separate Page.
NOTE: To Add New Range Please Select Only The Range That You Want To Add Now All Existing And New Range Together.
Resize Print Area Page To Fit Large Data On A Single Page In Excel
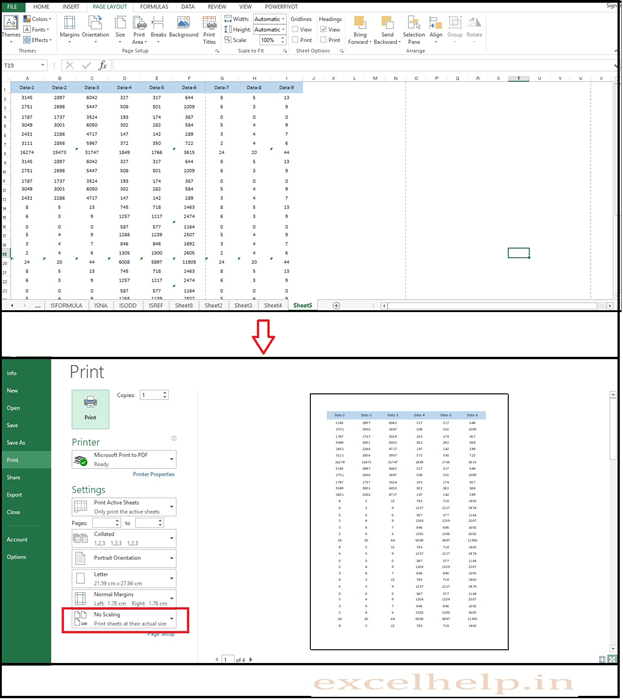
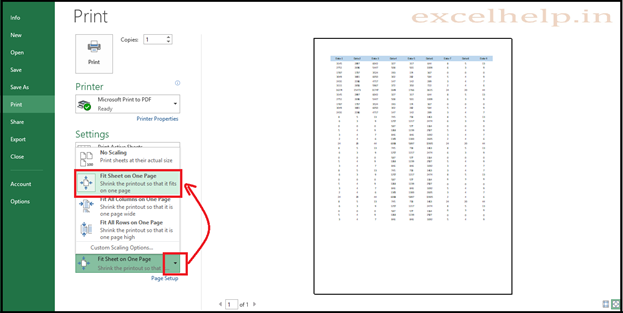
When You Try To Print A Entire Worksheet Data, Many Time We Face That Its Content Get Overflow For One Worksheet Page, And The Overflowing Columns Or Rows Content Get Printed As A Second Page. To Set And Print The Data In One Page You Can Use Print Area Page Available Option Of Resize The Print Area And Fit All The Content To Single Page. Please Check The Image Below.
STEPS :
- Click On File > Print Or Shortcut Key Ctrl + P
- Go To The Settings > Choose “Fit Sheet To One Page” Or Other Option Available Under Settings Drop Down Menu According To Your Requirement.
- You Can See The Live Preview On Print Page Once You Select Any Of The Option.
- Please Check The Images Below.
OVERFLOW LAST 3 COLUMNS
OVERFLOWING CONTENT FIT TO ONE PAGE
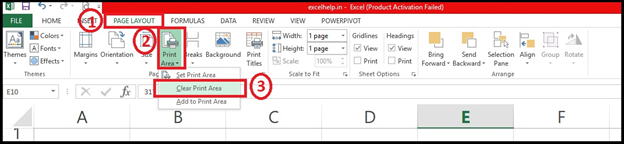
CLEAR PRINT AREAS :
STEPS:
- Click Anywhere On The Worksheet From Which You Want To Clear The Print Area Selection.
- Go To Page Layout Tab > Print Area Button > Click Clear Print Area.
- Please Check The Image Below.
NOTE: If Your Worksheet Contains Multiple Print Areas Selection, Then By Clearing A Print Area Will Remove All The Print Areas From Your Worksheet.